When you use normal incandescent bulbs for turn signals, and one blows, the S2000 will hyper-flash the remaining bulbs to highlight to the driver that a bulb has gone out or blown in the circuit. This is the same for most cars. When you switch to using LED bulbs which have a much lower power consumption, the S2000 will start to hyper-flash all the indicator bulbs during normal operation which is undesirable.
The established or traditional way to fix this issue is to hack your wiring loom and solder or crimp in to the wires a bunch of resistors to compensate for the lower led bulb power consumption. These resistors get hot so you have to be careful where you fasten these to your cars interior to avoid any burning or fires.
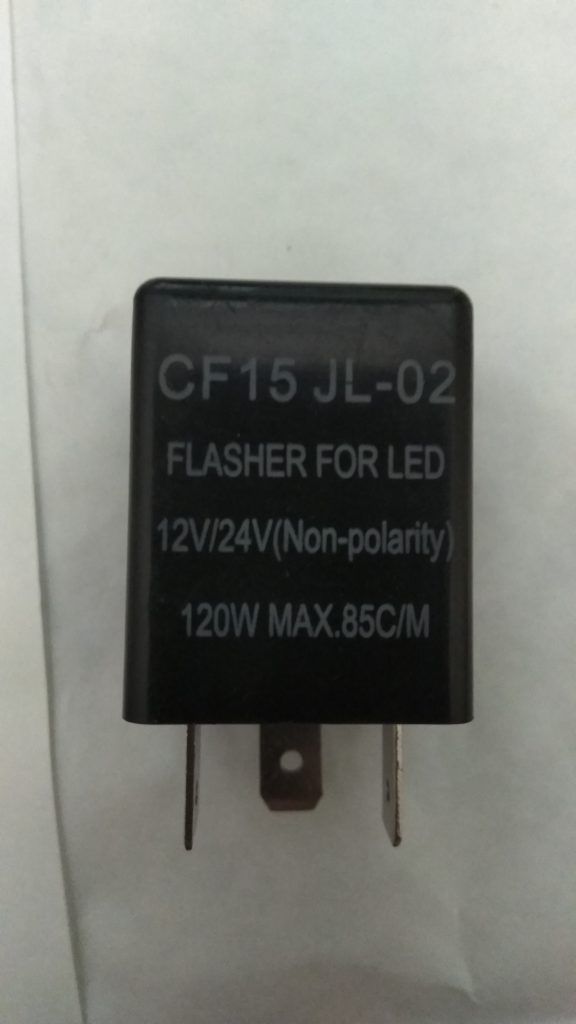
Here is my fix for the problem of hyper-flash when updating your bulbs to LED’s. The much cleaner way is to simply replace your flasher relay for an LED capable flasher relay. This then means you can mix and match the type of bulbs on your S2000 without the need for resistors and messy wiring. The LED flasher relay will work for normal incandescent bulbs and LED bulbs, so you can replace the bulbs one stage at a time.
I have done my research and found that some of the LED relays are too large to fit in the S2000 fuse box. There is however a relay which fits nicely and will solve your issues with hyper-flashing. It is the CF15-JL02 LED Flasher relay.
Step 1. Find the indicator flasher relay in the under dashboard fuse box. Black square box in picture (non OEM shown)
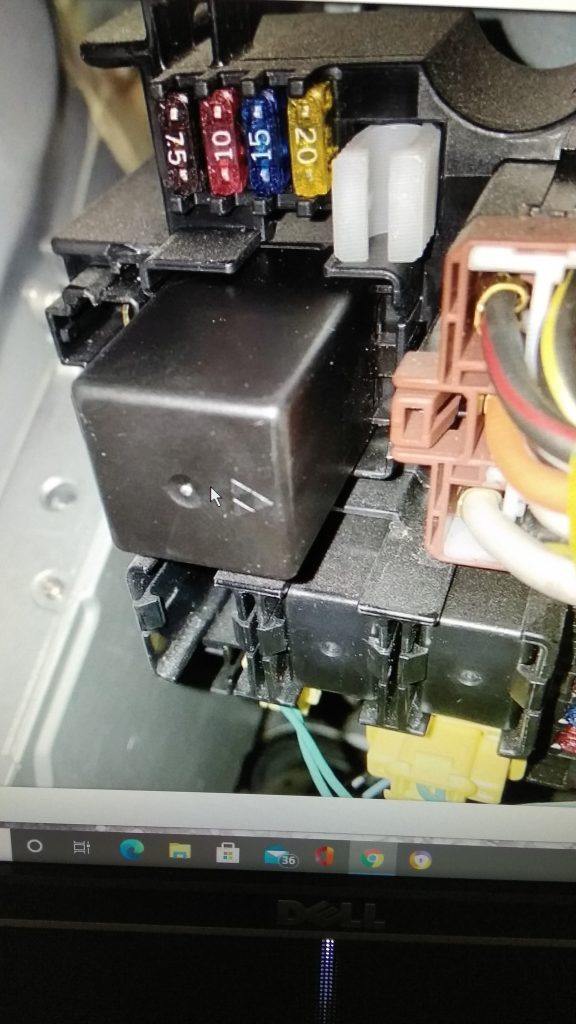
Step 2. Using 2 small thin flat screwdrivers carefully separate the clips on each side of the relay at the same time to allow you to extract the OEM flasher relay. Its fiddly, but I managed it in about 10 minutes. Some have really struggled with this step. The secret is to get one side un-clipped and leave your screwdriver in place whilst you un-clip the other side. If you try to release one side then the other, it will pop back into place each time. Be patient.
Step 3. Pull out the OEM relay and keep as a spare.

Step 4. Insert your new CF15-JL02 LED relay into the 3 pins in the fuse box.
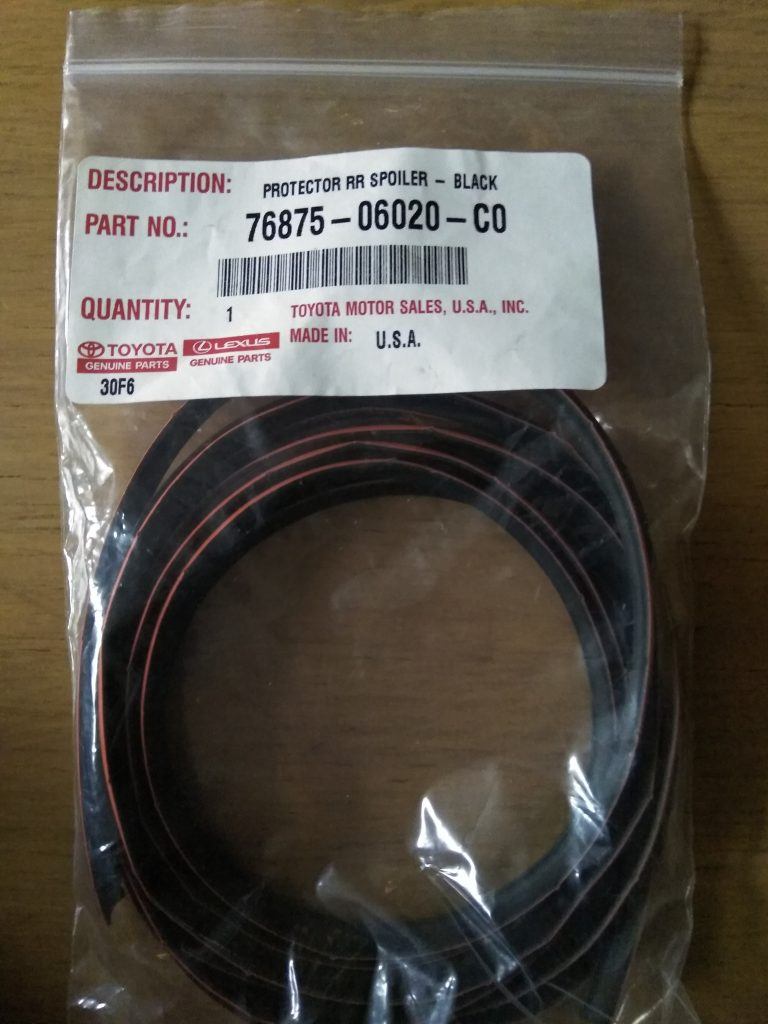
The Honda front lip seal for mounting the front lip is now discontinued. Please order this Toyota part (76875-06020-C0 Protector RR Spoiler – Black) as a substitute. Works perfectly and cost circa. £17 from your local dealership.
This manifests itself as a strong smell of fuel when starting the car or whilst running. First thing to try is to look at the fuel injector seals in the inlet manifold whilst the fuel pump primes (ignition switch on – but not start). Have someone stare at the top of the four injector seals and check that the seals remain dry after the fuel pump primes. If one or more bleeds fuel it can be the seals themselves or the actual fuel injector body which leaks.

The cheap fix to try is to replace the seals first, if it still leaks, you will need to replace the fuel injector.
The picture shows the orifice where the fuel was leaking out from on the injector.
When re-installing the injectors use clean engine oil on the o-ring seals to stop them from tearing.
This is caused by the latches themselves on the soft top. Small sections of plastic foam material can be inserted down both sides of the latch boxes so that tapping them will not cause them not to rattle.
This is caused by not using the upgraded hard top latches and misalignment of the hard top. Fitting instructions for the hard top show the brackets can be adjusted to create the correct clamping height and position.
This is usually caused by the slider pins in the brake calipers being seized up. You will find un-evenly worn brake pads and possibly warped disks from this. Uneven brake pad pressure will heat up one side of the disk more than the other causing warpage.
Un-seize the slider pins by whatever means necessary and remove completely. Clean out the caliper housing and clean the slider pin of all rust and corrosion. Then re-lubricate with silicon grease or red grease not copper grease. After re-assembly the slider pins should be free to move by hand.
If you are running a de-cat exhaust pipe, you can sometimes experience the engine light coming on. This can be fixed by using an o2 spacer connector packed with some stainless steel wool.
This is usually caused by the temperature switch failing which is fitted to the bottom of the radiator on the left hand side where the coolant hoses are. Check this is your problem by removing the connector wire to the fan switch and shorting the two pins together. Switch the ignition on to test if the fans start to work. Fixed by simply replacing the switch with a new one. You can use this as a good time to replace your coolant (by drain and refill and bleed) or simply unscrew the old switch and replace with the new switch and try not loose any coolant. You might introduce some air pocket but it will usually work it way through the system no problem.
See our page on replacement wheel arch panels here.
You will probably need to order the Honda rear inner arch panels and the rear wheel arch extension panels to save your body shop from spending hours fabricating repair panels for these. The rust usually extends into these inner arch panels and they are very thin metal. (<0.7mm) The wheel arch extension panels are much stronger steel. (<1.2mm)
| L Rear Arch Inside Panel | 64701-S2A-300ZZ |
| R Rear Arch Inside Panel | 64301-S2A-300ZZ |
| L Rear Inner Wheel arch extension | 64721-S2A-J00ZZ |
| R Rear Inner Wheel arch extension | 64321-S2A-J00ZZ |
Symptoms of this are difficulty in selecting gears, low clutch biting point, and signs of fluid leaking down the bulkhead or drips building up on the end of the clutch master where the rod goes into the cylinder. Usually caused by infrequent changing of the clutch fluid and contaminants damaging or wearing down the seals inside. Only solution is to replace the clutch master cylinder.
See other FAQ about squeaky clutch pedal. If its still problematic after that, then try removing the gear leaver and its assembly. You can clean off all the old dried up grease and dirt and re-grease the plastic collar with Honda UREA grease and re-assemble. It is also advisable to replace the plastic ball and cage plastic parts which the gear lever moves in. This will restore the gear shift feel back to as new condition.
This is caused by the springs in the clutch pressure plate becoming loose. It is not something to worry about and was common in the pre-facelift cars. Fitting the Honda OEM upgraded clutch kit will resolve this.
This is usually caused by the clutch slave cylinder. If you remove the slave cylinder from the side of the gearbox (two bolts) and extract the piston from the boot, you will be able to clean and if necessary sand off the nipple which might have formed on the ball of the piston rod. Clean out the dirt and rust in the socket on the end of the clutch fork. Lubricate with some high temp grease (Honda UREA grease) on the ball and socket and re-fit. Ensure the ball sits in the clutch fork socket before replacing the bolts. Replacing the clutch fluid in the system will also improve the clutch pedal feel.
Very common problems usually found when you take your car for an alignment check and the mechanic cannot adjust the settings. Caused by the design of the bushes. They have bolts running through metal sleeves which corrode. The bolts then become seized to the bush metal sleeve and therefore cannot be removed from the suspension. The only way to correct this is to cut through the bolt on both sides of the bush, so it falls out. You then need to press out the old bush and replace with either new OEM bushes or one of the many polyurethane bush kits. You will also need new Honda nuts and bolts to refit. This can work out to be quite labour intensive so many tackle this themselves as a DIY project. I does require a shop press of at least 12 tonnes, a sawsall and all the replacement hardware and bushes. It would be of great benefit to have a bush press kit as well to use the shop press effectively.
Clean your IACV or Idle Air Control Valve.
This is the small unit which bolts to the side of the inlet manifold near the throttle body cable. This can be unbolted from the inlet manifold and cleaned inside where carbon build up will be stopping the mechanism from turning smoothly.
This affects cars in colder climates, and is to do with the actuator not retracting fast enough and making a noise. Only fix is to rebuild / clean the starter or replace.
These can fail randomly but signs of failure are ticking tappet style noises at idle, either when cold or hot. These noises will go away when you blip the throttle or rev the engine. If left, it will stretch the timing chain and push your timing out, causing loss of power and poor running. The fix is to replace the TCT or Timing Chain Tensioner with an upgraded one from either TODA, Ballade Sports or OEM. Its takes about 30 mins if you work slowly and methodically. This can easily be undertaken by a competent home mechanic following the many guides out there on YouTube.
It is quite common for the OEM replacement TCT to suffer the same problems so nearly all owners opt for one of the upgraded parts.
I personally do not recommend the sand blasting or refurbishing of your original TCT. Microscopic debris can embed into the metal surface and is only released when in contact with hot motor oil. This is not good for any engine.
There are a few common wear hot spots, which can result in a torn roof. If your leaks are from the window rubbers, then it will need them removing from the front of the roof by removing the screw securing them, and then resealing the rubber and refitting.
These are just a few of the known problems which occur over time.
We will be posting articles about each issue and how to resolve them in due course. So keep checking for updates or join or news letter and be notified when we post an update.

Very very helpfull
Thanks Phil